Trouble-shooting and Analysis
Calibration and "First Use" Problems
If
you are just starting to use PHD2 or are connecting to new equipment
for the first time, you may have trouble getting the guider calibration
done. This problem usually takes one of two forms, each requiring
different responses:
- The star moves during calibration but
it moves "too far" or "too little." This is easy to fix - simply
adjust the 'calibration step-size' parameter in the 'Mount' tab of Advanced Settings. The help content there describes how this parameter is used, and you should be able to resolve the problem quickly.
- The
star doesn't move at all or it moves only very small amounts and in
unpredictable ways. Actually, the small movements in this
scenario are often the result of seeing deflections and the mount isn't
really moving at all. Dealing with this sort of problem is
described next.
In
nearly all cases, the "no movement" problem is caused by failures in
the hardware or, even more likely, problems in the cabling and
connections. The best tool for trouble-shooting this is the
'Manual Guide' option under the 'Tools' menu, as described in the Tools
section of this help document. Simply use the directional
controls in the 'Manual Guide' window to send commands directly to the
mount. If the mount does not respond, you know you have either
hardware or connectivity problems to resolve - nothing to do with PHD2.
If you're using a Shoestring device to connect to the mount,
watch its indicator lights to see if the commands are reaching it.
Similarly, your ST-4 compatible guide camera may have indicator
lights to show when guide commands are being received. If you're
using an ASCOM connection to the mount, be sure the COM port
assignments are correct. You can also use some of the
ASCOM-supplied tools like POTH to be sure the ASCOM driver is
communicating correctly with the mount.
Calibration Sanity-Checks
It is also possible that the calibration process will complete but PHD2 will post a "calibration
sanity-check" alert message saying that some of the results are
questionable. This "sanity check" dialog will show an explanation
of the issue and some details of the calibration results:
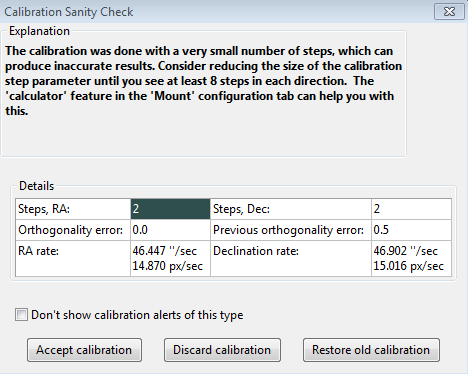
In the initial release (2.4.0), there are four things checked by PHD2:
- Too
few steps (shown above) - resolving this issue is quite easy.
Just adjust the calibration step-size downward until you get at
least 8 steps in both the west and north calibrations.
- Non-orthogonal
camera axes - the camera axes are normally computed independently even
though they should be perpendicular. The angle calculations do not require
great precision, but if they are signfiicantly non-orthogonal, you
should repeat the calibration. Alternatively, you can set the
option to'Assume Dec orthogonal to RA' in the 'Mount' tab of the Advanced Setup dialog.
- Suspicious
RA and Dec rates - the guide rate for right ascension should be related
to the declination guiding rate by approximately a factor
of cosine(Declination). In other words, the RA rate gets
smaller as you move the scope further away from the celestial equator
(Dec=0). In this initial release, PHD2 won't try to identify
which rate is incorrect - it is simply alerting you that something
looks wrong with the rates. You can sanity check these rates
yourself quite simply. If you are guiding at 1X sidereal rate,
your declination guide rate should be approximately 15 arc-sec/sec;
with a guide rate of 0.5X sidereal, the declination rate would be 7.5 arc-sec/sec,
etc.
- Inconsistent results - if the calibration results are
significantly different from your last-used calibration, an alert
message will be generated. This may happen because you've made a
change in your configuration. That doesn't imply a real problem,
but you should probably consider creating a separate profile for the
new configuration. By doing so, PHD2 will remember settings
for each of your profiles, letting you switch between them easily.
If you haven't made a configuration change, you will probably
want to determine why the results are so different.
With any
of these alerts, the relevant data field will be highlighted based on the
type of message. You can choose to ignore the warning ('Accept
calibration'), re-run the calibration ('Discard calibration'), or
restore your last good calibration ('Restore old calibration').
With the third option, you can defer calibration until later and
start guiding with your last good calibration data. If you see
repeated alerts on the same topic and are convinced there really
isn't a problem, you can use the 'don't show' checkbox to block
future alerts of that type. Program "Hangs" and Camera Download Problems
In
some cases, you may experience problems where guider images aren't
downloaded or displayed. In extreme cases, this may even cause
PHD2 or other camera-related applications to be non-responsive (i.e. to
"hang"). Again, this is almost always due to hardware, camera
driver, or connectivity issues, with one of the most common
culprits being a faulty USB cable or device. It is highly
unlikely to be caused by an application like PHD2, so you should begin
your investigation at the lower levels of the system. You can start by
confirming that the guide camera is working - try using a short, direct
cable from the camera to the computer and taking exposures with the
"native" or test application that came with the camera. If the
camera is functional, you can start moving "upstream" by looking at USB
hubs and cables, swapping them one at a time to see if you can isolate
the problem. It's worth remembering that we work in a "hostile
environment" while doing our imaging, and many of the components we use
are not designed for cold, outdoor conditions. So something that worked
just last week or last month may no longer be reliable.Poor Guiding Performance
Once
you've gotten everything running, you will probably get reasonably good
guiding results almost immediately. You will have to decide what
"good enough" means, and everyone's standard is likely to be different.
But if you find your imaging results are not acceptable
because the stars are streaked or elongated, you'll need to take a
systematic approach to correcting the problems. This can be a
complex task and not something to be covered here. However, you
can get help on the web from a variety of sources, with the document by
Craig Stark being one of the best:
http://www.cloudynights.com/page/articles/cat/fishing-for-photons/what-to-do-when-phd-guiding-isnt-push-here-dummy-r2677.
Log Analysis
Any
sort of problem isolation or "tuning" will invariably require use of
the PHD2 log files. Both are formatted for straightforward
interpretation by a human reader, and the guide log is constructed to
enable easy import into other applications. As mentioned in the
'Advanced Settings' section, applications such as PHDLab or Excel can
be used to visualize overall performance, compute performance
statistics, and scrutinize time periods when guiding was problematic.
With Excel or similar applications, simply specify that the guide
log uses a comma as a column separator.
Guiding Log Contents
The
contents of the guiding log will continue to evolve as new capabilities
are added. But the basic content is stable, and considerable care
is taken to not "break" applications that parse it. If you wish
to analyze the log yourself, the following information will be helpful.
The PHD2 guide log will contain zero or more sequences of
calibration and zero or more sequences of guiding. Each of these "sections" has a
header that provides most of the information about the guiding algorithms being
used and the internal parameters used by PHD2 for guiding. At the start of either a calibration run or
a guiding sequence, the last line of the header information defines a set of
column headings. The meanings of those
columns are shown below:
Calibration columns:
- dx, dy
are offsets from the starting position, in pixels, in the camera coordinate
system
- x, y are the camera x/y coordinates of the guide
star at the end of each calibration step
- Dist is the total distance moved in the camera
coordinate system (dist = sqrt(dx*dx + dy*dy).
This is the value used by PHD2 to compute the calibration parameters
Guiding columns:
- dx, dy are the same as for calibration - offsets
from the "lock position" of the guide star in the camera coordinate
system
- RARawDistance and DECRawDistance - these are the
transforms of dx and dy into the mount coordinates - in other words, they use
the arbitrary angle of the guide camera to map from X/Y on the camera to RA/Dec
on the mount
- RAGuideDistance and DECGuideDistance - these are
the outputs from the various guiding algorithms. The guide algorithms operate on the
"raw" distances and decide how far, if any, the telescope position
should be adjusted in each axis. For
example, with a "minimum move" parameter set, the "guide"
distances can be zero even when the "raw" distances are non-zero.
- RADuration, RADirection, DECDuration, DECDirection
- these are the values determined by the two "guide" distances
above. The "durations" are the
lengths of the guide pulses, in milliseconds, needed to move the mount by the
distances specified by RAGuideDistance and DECGuideDistance
- XStep, YStep - step-adjustment durations for the
adaptive optics device if one is being used
- StarMass - a brightness measure of the guide
star image
- SNR - an internal "signal-to-noise"
ratio used by PHD2
- ErrorCode - an indication that some error
occurred, typically a "guide star faded" error
All "distance" values are in units of pixels. The header for the guiding section will show
the image scale as it is known by PHD2, and that can be used to scale the pixel
distance values into units of arc-seconds if desired.
Problem Reporting
If
you encounter application problems that are specific to PHD2, you
are encouraged to report them to the open-phd-guiding Google group: https://groups.google.com/forum/?fromgroups=#!forum/open-phd-guiding.
Obviously, the more information you can provide, the more likely
we will be able to resolve the problem. Using the following
guidelines will help in that regard:
- Try to reproduce the
problem - if we have a clear set of steps to follow, we are more likely
to find a solution quickly. If you can reproduce it, try to
reduce things to the minimum number of steps. Remember, we won't
have your hardware or computer environment when we try to reproduce it
ourselves.
- Try to be complete about describing your configuration - operating system, equipment types, PHD2 version, etc.
- Attach
the PHD2
debug log from the session in which you encountered the
problem. You can find the debug log in the PHD2 folder in your
Documents folder. If you can't reproduce the problem, try to
estimate the
time of day when you first saw it - this could help us find evidence in
the debug log without having to sift through hundreds of lines of
output.