Using PHD2
Guiding
There are five basic steps to start guiding.
- Press the camera button and connect to your guide camera
and mount.
- Pick an exposure duration from the drop-down list.
- Hit
the loop button and look at the available stars, adjusting focus if
necessary. Move the mount or adjust the exposure duration as needed to
find a suitable guide star.
- Click on a non-saturated star that's not very near an edge
for use as the guide star.
- Press the PHD2
Guide button.
Details of these operations will be described in the sections below.
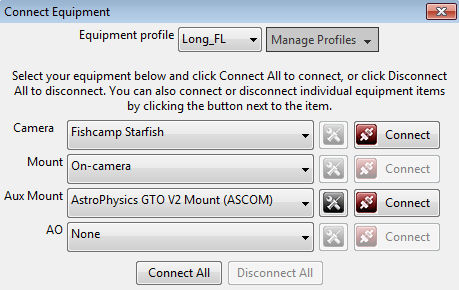
Equipment Connection
In
order to begin guiding, PHD2
must first connect to your hardware: the
guide camera, the mount, and, optionally, an 'aux' mount or adaptive optics
(AO) device. When you click on the camera
icon, you'll see a dialog that looks like this:

Camera Selection
The
Camera drop-down list shows all the camera types currently supported by
PHD2.
With the exception of ASCOM-compatible cameras, the
camera drivers are bundled with PHD2 and
will reside
on your system after the PHD2
installation. ASCOM-compatible
camera drivers are available from the ASCOM web site or from the camera
manufacturer, and the drop-down list will show only those ASCOM cameras
that are already installed on your system, if any.
The
list of supported cameras at the time of writing is shown below - but
users should consult web resources to see updates (e.g. Stark Labs)
Supported cameras, December 2014:
Windows:
- ASCOM v5/6 compliant cameras
- Atik 16 series, color or monochrome
- Atik Gen 3 color or monochrome
- CCD-Labs Q-Guider
- Fishcamp Starfish
- iNova PLC-M
- MagZero MZ-5
- Meade DSI series: I-III, color and monochrome
- Orion StarShoot DSCI
- Orion Starshoot Autoguider
- Orion Starshoot Planetary Imager and Autoguider
- QHY 5-II
- QHY 5L-II
- SAC4-2
- SBIG
- SBIG rotator
- Starlight Xpress SXF / SXVF / Lodestar
- Webcams (LXUSB, parallel, serial, OpenCV, WDM)
- ZWO ASI
Mac:
- Fishcamp Starfish
- KWIQGuider
- Meade DSI series: I-III, color and monochrome
- Orion Starshoot Autoguider
- SBIG
- Starlight XPress SXV
- The Imaging Source (DCAM Firewire)
- ZWO ASI
Mount Selection
The Mount drop-down list displays options for connecting to
your mount. There are generally two ways to do this:
- Use
an ASCOM-compatible telescope driver that sends guide commands to the
mount over a serial cable (or more commonly, a USB/Serial
connection)
- Use
the ST-4 compatible guide port interface on the mount with a
specialized cable and an intermdiate device like a camera or a
Shoestring box
The
ASCOM interface relies on third-party drivers to communicate with the
mount. These drivers are available from the ASCOM web site (ASCOM Standards)
or
from the mount manufacturer - they are not distributed with PHD2. So
the drop-down list will be populated by only those ASCOM drivers you
already have installed on your system. The ASCOM driver must
support the 'PulseGuide' interface, which has been a requirement for
ASCOM compliance for many years and is widely supported.
With this type of mount control, guide commands are sent from PHD2 to
the mount over the serial interface. The high-level PHD2 guide
commands (e.g. "Move west 500 mSec") are translated by the mount
firmware into the appropriate motor control signals to execute the
command. With the ASCOM interface, PHD2 can also
obtain the
pointing position of the mount, especially the declination and side-of-pier, which can
be used as factors in guider calibration.
The "Guide-port"
interfaces use a specialized, hardware-level control port available on
most mounts. To use this type of interface, there must be
another
device in the link between PHD2
and the mount:
- Any of the guide cameras which have an ST-4 compatible
"on-camera" guider interface. Use the 'on camera' mount choice for these setups.
- Any of the Shoestring GP-xxx devices
- A supported AO device with a guide port interface
With
this style of interface, PHD2
guide commands like "Move west 500
mSec" are translated by the intermediate device (camera, Shoestring
box, AO) into electrical signals necessary to drive the mount
motor for the correct length of time.
"Aux" Mount Selection
If
you have selected an ST-4 style of guiding in the 'mount'
section, that interface cannot be used to query the pointing
position of the telescope. As a consequence, guider
calibration won't be automatically adjusted for declination, nor will
it be automatically "flipped" when the side-of-pier changes. You
can restore these features by specifying an "aux" mount connection that
will be used only to get the telescope pointing information. An
example is shown below:
For
Windows users, the "aux" mount can use any of the ASCOM-compatible
mount drivers, while Linux users can take advantage of INDI drivers.
The "aux" mount choice will be used only if the primary mount
interface cannot return pointing information - it will otherwise be
ignored.
Adaptive Optics Selection
With
PHD2, you
now have the option of controlling the Starlight Express
adaptive optics unit. If you don't have such a device, just
leave
the AO selection at 'none.' Support for other AO devices may
be
added in the future.
Simulators
All
of the PHD2
devices -
camera, mount, AO - include built-in simulators. You can use
these simulators to explore how PHD2
works and to decide how you want
to use the program. There's no reason to waste valuable
dark-sky
time learning to use PHD2!
Virtually all of PHD2's
features, including full
calibration and all the graphical display options, will work properly
when device simulators are used. You will even
see fairly realistic guiding performance to give you some idea of what
to expect in the field. To get started using the simulators,
choose 'Simulator' for the camera type and 'On-camera' for the Mount
type.
Equipment Profile
At the top of
the 'Connect Equipment' dialog are some additional controls for
managing equipment profiles. All of the guider settings in PHD2,
default or otherwise, are automatically stored as part of an equipment
profile. If you have only one guiding setup - you use the
same
camera and guide scope combination each time - you will only need one
profile; and you can just use the default profile. But you
may
have multiple equipment configurations - for example, an
off-axis-guiding arrangement for a long focal length scope and a
separate guide scope/camera configuration for s shorter focal length
imaging scope. The PHD2
guide settings for those configurations
are likely to be different, so you would want to use separate equipment
profiles The controls at the top of the 'Connect Equipment'
dialog let you choose the profile you want to use and to
create/edit/remove profiles as you see fit. When you select a
profile and connect to its associated equipment, all of the
settings last used with that profile are automatically
reloaded.
Once you've established the profiles you need - perhaps only
the
default one - you can simply click on the 'Connect All' button and
you're ready to move ahead.
The
recommended way to create a new profile is to use the "Wizard"
capability. The wizard takes you through a sequence of dialogs
that explain the various settings and help you decide how to set
them. It will also calculate a recommended set of guiding
algorithm settings that are likely to get reasonable results right
away. When you run PHD2 for the first time on your system, this
wizard will be automatically launched. Subsequently, you can use
the new-profile wizard by clicking on the 'Manage Profiles' field in
the 'Connect Equipment' dialog, then choosing 'New using
wizard...'.
If
you already have a suitable default equipment profile and you simply
want to connect to the equipment "just like before", you can do a
<shift>-click on the main screen 'Camera' button and PHD2 will
automatically re-connect to your hardware.
Exposure
Time and Star Selection
The
guide star can be selected (clicked on) while "looping" is active - in
fact, this is the recommended method. It can also be selected
after looping has been stopped, but this opens the possibility that the
star might have moved since the last exposure. No great
precision
is required in clicking on the star - PHD2 will find the
star
nearest to the cursor. After you do this, a green box will
appear to frame the star. If you pick a star that is too
bright, a message box will tell you the star is "saturated", and you
should
either use a different star or decrease the exposure duration.
The choice of exposure time will
depend entirely on your equipment, sky conditions, and the available
stars. The exposure time you choose has two major
implications:
- It
affects the signal strength (brightness) of the selected star - a
brighter star will
stand out better from the background and will generally produce
better guiding results so long as it is not saturated.
- It
also determines the frequency with which guide commands are sent to the
mount - guide commands cannot be sent any more frequently
than once for each exposure cycle. Some mounts benefit from
frequent small guiding adjustments while others do not - you may need
to experiment to understand what works best for your situation.
As a starting point, try using exposure durations in the range
of one to five seconds. Rather than choosing the star yourself with a mouse-click, you can let PHD2 Auto-select the guide star by using the Alt-S keyboard shortcut after stars are visible in the main display.
There is also an Auto exposure time selection available. When exposure
is set to Auto, PHD2 will attempt to adjust the exposure to keep the
selected guide star at a constant signal-to-noise ratio (SNR) value.
The Auto setting can be especially beneficial for AO users who want to
minimize exposure time without losing the guide star. The settings to control
Auto-exposure are on the Global Tab of the Advanced Dialog.
Automatic
Calibration
Conventional Mounts
Two things need to be measured by PHD2
as part of guider calibration:
- The angle of the camera relative to the telescope
axes
- The length of the guide pulse needed to move the telescope
by a specific amount
PHD2
handles these measurements automatically by sending guide pulses to the
mount and "watching" how far and in which direction the star moves
between guide camera images. This process begins after you
have
selected a star and then clicked on the Guide icon button.
Yellow
cross-hairs will appear over the original location of your guide star
and PHD2 will start to move the mount in various
directions, tracking how the star moves as a function of what move
commands were sent to the mount. The status bar will display
the
commands as they are sent to the mount, along with the incremental
movements of the guide star relative to its starting position.
PHD2
will do this on both axes, first moving east and west, then
north and south. PHD2
wants to move the star up to 25 pixels in
each direction in order to get an accurate calibration. Once
this
is complete, the crosshairs will turn green and guiding will start
automatically..
In
most cases, calibration will complete automatically without any user
involvement. Obviously, this assumes that the mount and all
the
cable connections are working correctly. If they are not, the
calibration is likely to fail with a message that the "star did not
move enough"; and you'll need to do some trouble-shooting.
If the star has basically not moved at all in one or more
directions, you should look first at the cable connections and mount
behavior. The "manual guide" function under the 'Tools' menu can help
with this as can the trouble-shooting
section of this document. But if the star has moved by some
amount in each direction, you may need to adjust a calibration setting
called the
calibration step-size. PHD2
uses this parameter during
calibration as a fixed-size duration of movement. The default
value has been chosen to cover a wide range of typical guide scope
set-ups, but you may need to adjust it for your situation.
For
example, an off-axis-guider on a long focal
length scope will probably need a setting that's different from the
default value. To adjust it, go into the "brain dialog" (Advanced Settings) and
click on the 'Mount' tab. On that tab, you'll find a setting
for
'Calibration step(ms)', and that's where you change the value.
There's even a 'Calculate' button that will help you choose
an
optimal value for the parameter. Once you've set this value,
it
will be remembered as part of your equipment profile and you probably
won't have to adjust it again.
You may also see a
calibration failure if you're using a star too close to the
celestial pole. In those locations, fixed-length movements in
right ascension often move the star only a very small distance.
In that case, move to a star location closer to the equator,
ideally somewhere in the range of -30 to +30 degrees declination, and
re-run
the calibration. But if this is not feasible, you can adjust
the
calibration step-size upward until calibration succeeds.
Like
all
other guide settings, the calibration data is automatically
saved as part of your current equipment profile. If nothing
has
changed in your configuration from one session to the next - even over
an extended time period - you can restore the previous calibration data
and start guiding immediately. This function
is located
under the
'Tools' menu and is labelled 'Restore Calibration Data.'
Remember, the data are saved whenever a full calibration is
completed or when you use the 'flip calibration data' command under the
'Tools' menu (see below). If you're using a German equatorial
mount and the ASCOM interface or you have an 'aux' mount connected, the saved calibration data will include
the side of pier where you were last guiding; so PHD2 will adjust
automatically for your current pointing position. But if you
are
not using mount interfaces that can return pointing information, you'll need to remember which side of the
pier was being used the last time you were guiding.
If
you're using an ASCOM mount (or 'aux' mount) connection, PHD2 will also
include the
calibration and target declinations as part of its calculations.
In that case, guiding moves in right ascension will
be
automatically adjusted to account for the declination of the current
guide star, as opposed to the star you used for calibration.
This is really just a refinement and isn't critical in most
situations, so absence of pointing information is not a big problem. However, if you are concerned
about
it and are imaging near the celestial pole, you should consider
calibrating using a star that's also at high declination.
After
a calibration is completed, PHD2 will "sanity check" the results to be
sure the calculations at least look reasonable. If they don't,
you will see an 'alert' message at the top of the main window that
describes the calibration result that looks questionable. You can
choose to ignore the alert or click on 'Details' to get more
information. It is generally advisable to pay attention to these
alerts because there is no point in trying to proceed using calibration results that are significantly in error.
Adaptive Optics Devices
If
you are using an adaptive optics device, there are actually two
calibration processes that must complete. The first handles
calibration of the tip/tilt mirror in the AO and calculates the
magnitude and direction of the adjustments as they relate to
displacements of the guide star. The second calibration is
the
one described above, dealing with guide commands that need to be sent
to the mount. Known as "bump" commands, these will be
issued when the guide star has moved beyond the range of
corrections that can be achieved with the AO alone.
Guiding
Once guiding has begun,
diagnostic messages will be displayed in the status bar to show what
guide commanda are being sent to the mount. PHD2
will continue guiding until you click on the 'stop' icon. To
resume guiding, simply start looping exposures again, select your star,
and click on the 'Guide' button. You will not need to repeat
the
calibration in order to resume guiding. In some cases, PHD2 may
"lose" the guide star and
you'll be alerted by an audible beep and flashing orange crosshairs.
There are several reasons this might occur:
- Something may be obscuring the star - clouds, the
observatory roof, a tree, etc.
- The
star may have abruptly moved out of the tracking rectangle because
something shifted in the mount/camera/cabling infrastructure - cable
"snags" often cause this
- The star may have "faded" for some other reason, perhaps
because it is overly faint
Obviously,
you'll need to identify the source of the problem and fix it.
However, it's important to understand that PHD2 will not start
moving the telescope around in an attempt to relocate the guide star.
It will simply continue to take exposures and look for the
guide
star to reappear within the bounds of the current tracking rectangle.
When you first start guiding, you may see an 'alert' dialog at
the top of the window if no dark library or bad-pixel map is being
used. You can choose to ignore this warning and continue with
guiding, but you are likely to get better results if you spend the few
minutes needed to construct a dark library for future use.
If
you are using a German equatorial mount (GEM), you will usually have to
do a "meridian flip" around the time your image target crosses the
meridian. This means you will move the
telescope around to the opposite side of the pier and then resume
imaging. Doing this invalidates the original calibration,
typically because the declination directions are now
reversed. If you are using an ASCOM (or 'aux' ) mount interface, your
calibration will be adjusted automatically and you can simply resume
guiding (assuming you haven't also rotated the camera or focuser).
If you aren't using an interface that returns pointing position, you will need to
take
action to adjust the guider calibration. You can, of course,
simply do another
calibration on the "new" side of the pier, a process that will
typically take only a couple of minutes. Or, you
can use
the pull-down menu item under 'Tools' to "flip calibration data" and
then resume guiding immediately.
In some cases, you may
want to force a re-calibration. For example, you may have
rotated
the guide camera as part of resolving a cable problem. You
can do
this by clicking on the 'Brain button', moving to the 'Mount'
tab, and clicking the 'Clear Calibration' checkbox. Or, you
can
simply do a <shift>click on the 'Guide' button
on the main
screen and PHD2
will start a calibration run.
Once
you have started guiding, you will almost certainly want to know how
things are going. You can of course watch the star in the
guide
camera display but in many cases you won't be able to see all the small
adjustments that are taking place. But PHD2 provides many
tools
for measuring and displaying your performance, as described in the Visualization section.
Several of the guiding algorithms have limit settings for the
maximum guide correction that can be issued with a single command.
If these values are smaller than what is needed to correct the
mount's position, you will see an alert dialog at the top of the main window
advising you of the situation. If this is a recurring problem,
you may want to increase the values for these settings or otherwise
solve the underlying problem.